MATRIX Digital Rainfall Effect (Amstrad CPC) by Jason Brooks
A downloadable project
MATRIX Digital Rainfall Effect: 10 Lines of BASIC Code
by Jason Brooks
=================================================
Looking through some old projects, I was asked if I could recreate a MATRIX Digital Rainfall look alike in 10 Lines of BASIC code… This was in 2021 looking at the time stamps on my files, I was still recovering from major surgery.
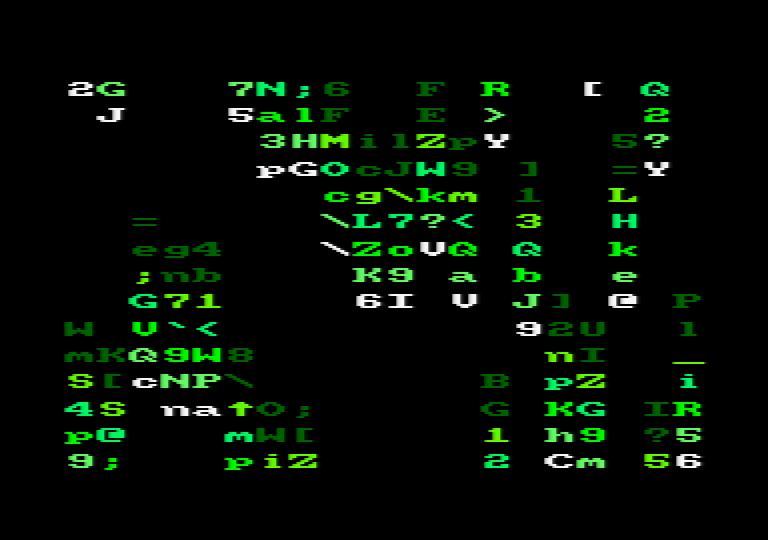
I gave it some thought, and came up with something simple. BASIC wouldn’t be fast enough to move all characters on the screen like the original film, therefore the simplest solution would be to draw random letters on the screen and rotate the colour palette to give the illusion of falling letters.
Palette switching advantages are speed for BASIC with a rather crude matrix style affect as you can see from the code below.
The MATRIX In Ten Lines of BASIC
Let’s get started, the code is shown below, I’ll try and explain the principle…
Line 10 – Mode and colour initialisation
Set BASIC to move to the quit routine when the user hits the escape key (Line 90)
Set MODE 0 – 16 Colour Mode
Set Border and Paper 0 to Black
Enable Graphics Text Mode
Define the colour table for the matrix
Line 20 – Initialise Variables, Tables and Offsets per character
Set variables P = 1, W = 1
P = current Pen
W = current White Colour Text Position on Y
We use this to only change the current white position of text on the column selected, giving the illusion the text is changing at the head of the rain effect.
Dimension an array of 16 colours and Y Offset Table for 21 entries
Reset the DATA to READ (In case you rerun the program)
F! is a real number to define the offset position of text on the Y-Axis
400 Raster Lines divided by 15 Colours to cycle = 26.6666666
Read all the colours into the colour table
Call routine at Line 50 to set the colours
Line 30 – initialise the screen with random characters and set the screen colours.
X = Loop for 20 iterations, Screen Width of chars in Mode 0
offset = random number between 0 and 14
OffsetTable is set for each initial starting offset
Loop for 15 iterations
Set the Graphics PEN to 16 – Current Loop Counter
Ensures we use all colours we’ll cycle
Call routine to print a random character in current selected colour
Line 40 – Main Loop
Call routine to rotate colour table.
Call routine to set new colours from table.
X = random position between 0 and 19
Y = Current position for
Set the Graphics Pen selection to the Colour in W
Set a new random character at position
We’re trying to creating changes in the matrix…
Loop back to 40 and run indefintely.
Line 50 – Set the INKS To Current Table
Loops 16 times to set the INKS via the current table cols()
returns
Line 60 – Rotate the Inks Table and set the Head to Where White is in the table.
Wait for framefly back (The CRT Raster to move from bottom right of the screen to top left.
You can get more information on this from AMSOFT 968 Publication, aka The Firmware Guide.
If you remove the call, the program will run a smidge faster. Try it and see.
Get the current colour for INK 1 from table
If the colour = Bright White we’ll set W to 15
Line 70 and 80 – Rotate the Colour Table
Increment P
P MOD 15 + 1, ensures our pen is in range 1 -> 15
Loop 14 Times
Copy Colour from Colour table index + 1 to index
Rotate the colours down by one
15th loop copy what was in A to position 15 (Looping everything round again).
Return
Line 90 – Handle the user quitting by setting the INK and Pen to something they can see
When user hits Escape Key Set PEN to 1, INK 1 to Bright White
Disable Graphics Text mode
End the program, returning control to BASIC
Line 100 – Write a random character for the correct position.
Calculate the correct Y offset based on Offset Table stored in OT multiplied by the fixed constant (400/15)
Move the Graphics cursor to the correct position
Print a random ASCII Character at the Graphics Cursor Position
Return
The BASIC Code
10 ON BREAK GOSUB 90:MODE 0:BORDER 0:INK 0,0:TAG:DATA 0,26,22,18,19,21,9,9,0,0,0,0,0,0,0,0
20 p=1:w=1:DIM cols(16):DIM ot%(21):RESTORE:f!=400/15:FOR i=0 TO 15:READ a:cols(i)=a:NEXT:GOSUB 50
30 FOR x%=0 TO 20:offset%=(RND(1)*14):ot%(x%)=offset%:FOR y%=1 TO 15:GRAPHICS PEN 16-y%:GOSUB 100:NEXT:NEXT
40 GOSUB 60:GOSUB 50:x%=(RND(1)*19):y%=16-w:GRAPHICS PEN w:GOSUB 100:GOTO 40
50 FOR i=0 TO 15:INK i,cols(i):NEXT:RETURN
60 CALL &BD19:a=cols(1):IF a=26 THEN w=15
70 p=p+1:p=(p MOD 15)+1:FOR i=1 TO 14:cols(i)=cols(i+1):IF cols(i)=26 THEN w=i
80 NEXT:cols(15)=a:RETURN
90 PEN 1:INK 1,26:TAGOFF:END
100 offset2=399-(((ot%(x%)+(y%-1)) MOD 15)*f!):MOVE x%*32,offset2:PRINT CHR$((RND(1)*65)+48);:RETURN
It works, and simple for a BASIC program… Though you may notice only one column changes for each colour cycle rotation.
Can you improve this? Well you could modify line 40 as follows :-
1
40 GOSUB 60:GOSUB 50:FOR i=1 TO 4:x%=(RND(1)*19):y%=16-w:GRAPHICS PEN w:GOSUB 100:NEXT:GOTO 40
As a result we add a loop to change four random column characters, it will slow the program down a smidge but give the illusion of more activity.
I’m sure smarter people than I can optimise this further for better effects. If you had more than ten lines of code to work with, you could add UDGs to simulate more of the original Matrix Character Set.
Download
Leave a comment
Log in with itch.io to leave a comment.